Creating a new partition in Ubuntu 22.04
04/12/2023 - 3 phút

Step 1: Check the hard disk partition
sudo df -h
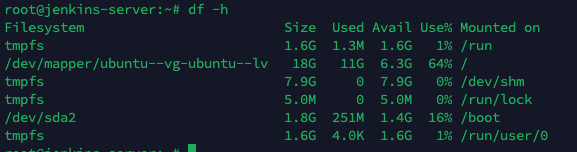
So, I have a hard drive named /dev/sda with a capacity of 20G
Step 2: Identify the Disk
Use the lsblk command or sudo fdisk -l to list all disks and partitions. Find the disk or partition you want to mount. It will look like /dev/sda1, /dev/sdb, etc.
sudo fdisk -l
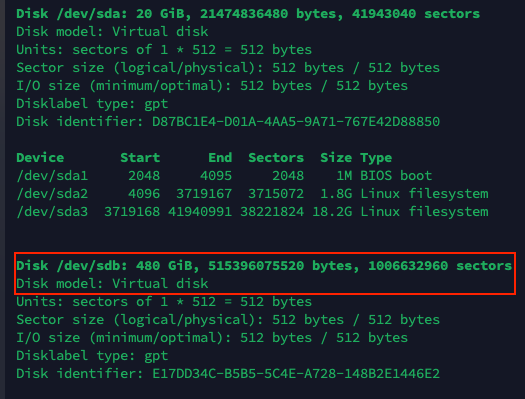
Here, I have a disk named /dev/sdb with a capacity of 480G
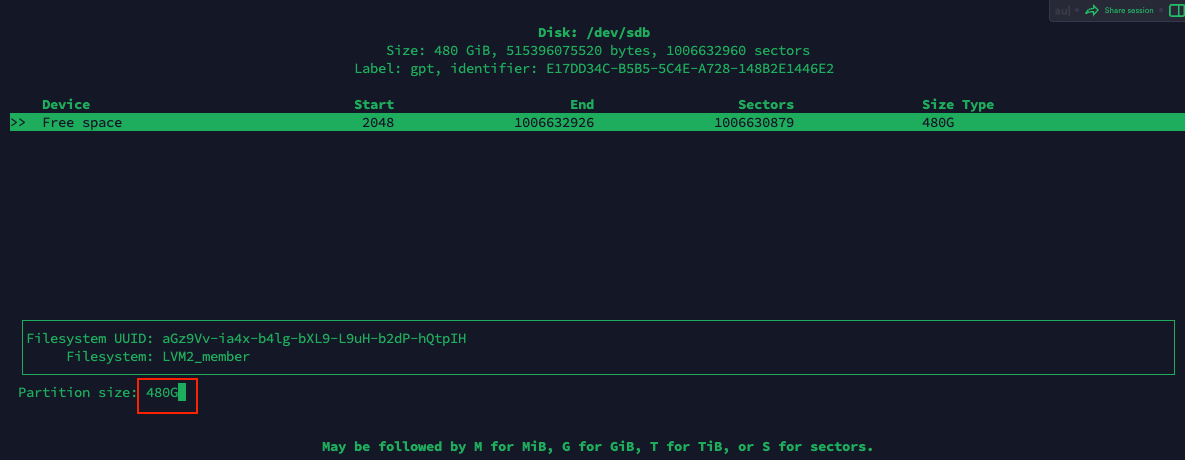
Step 3: Create a new partition
Use the cfdisk command to create a new partition on the disk /dev/sdb
sudo cfdisk /dev/sdb
Choose “New” to create a new partition
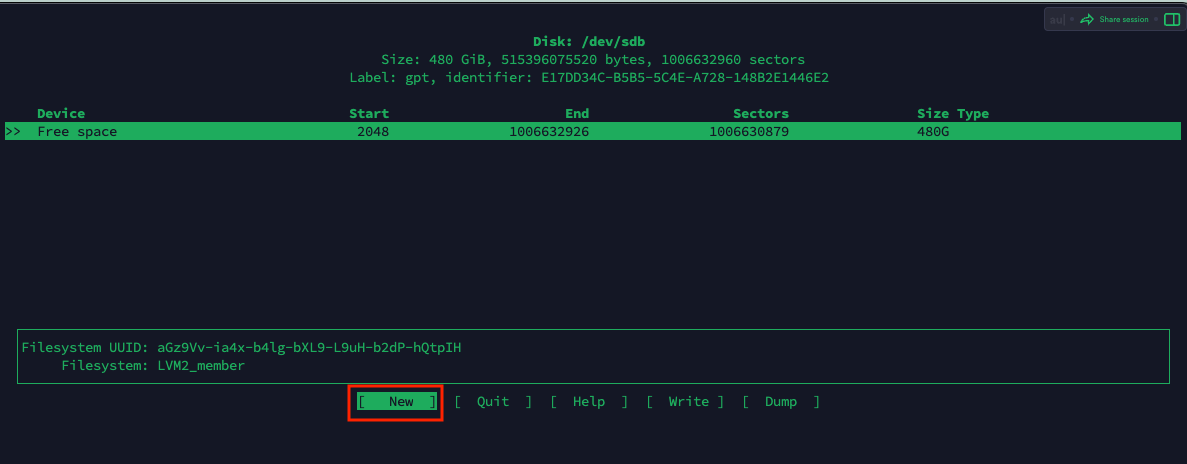
Enter the amount of capacity needed to create a new partition, here I choose 480G
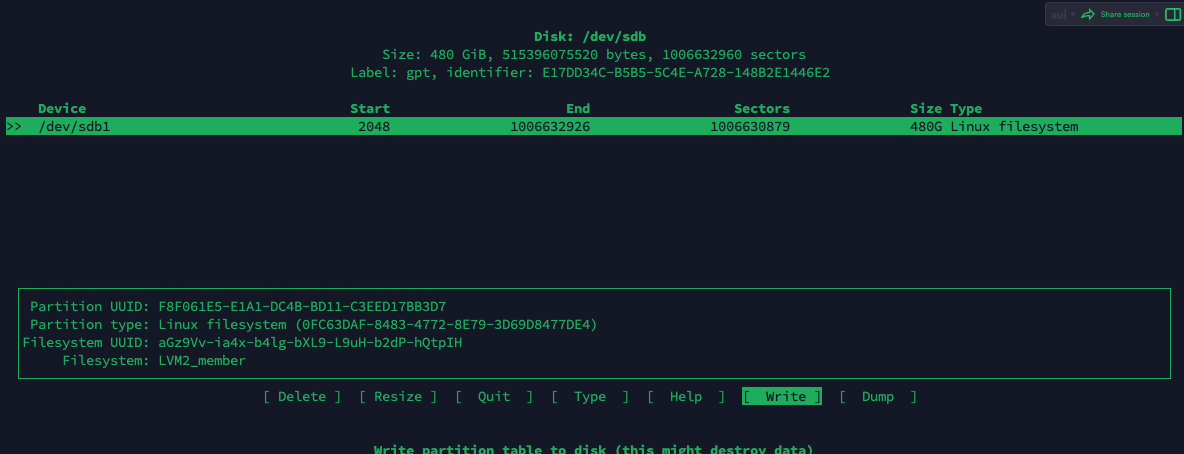
Choose “Write” to save
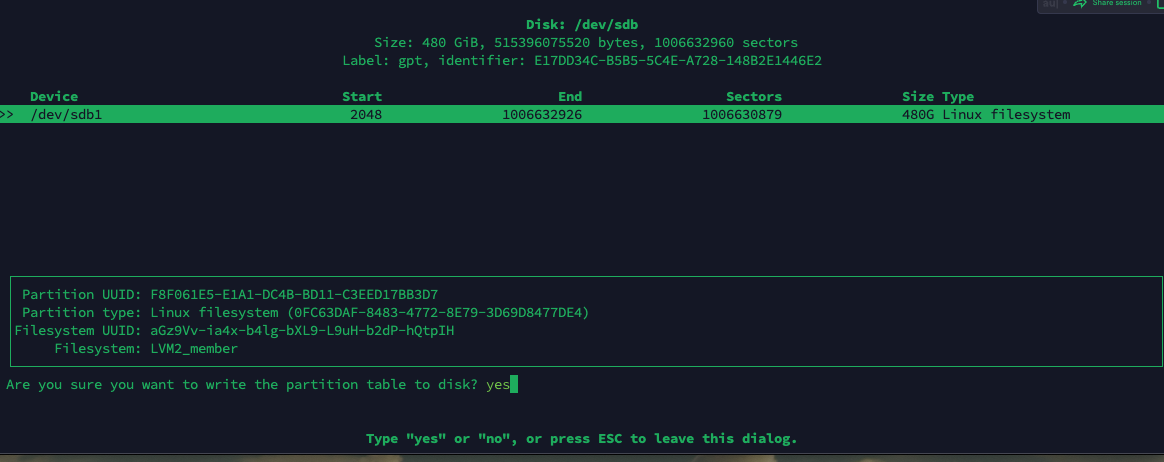
Enter yes to confirm
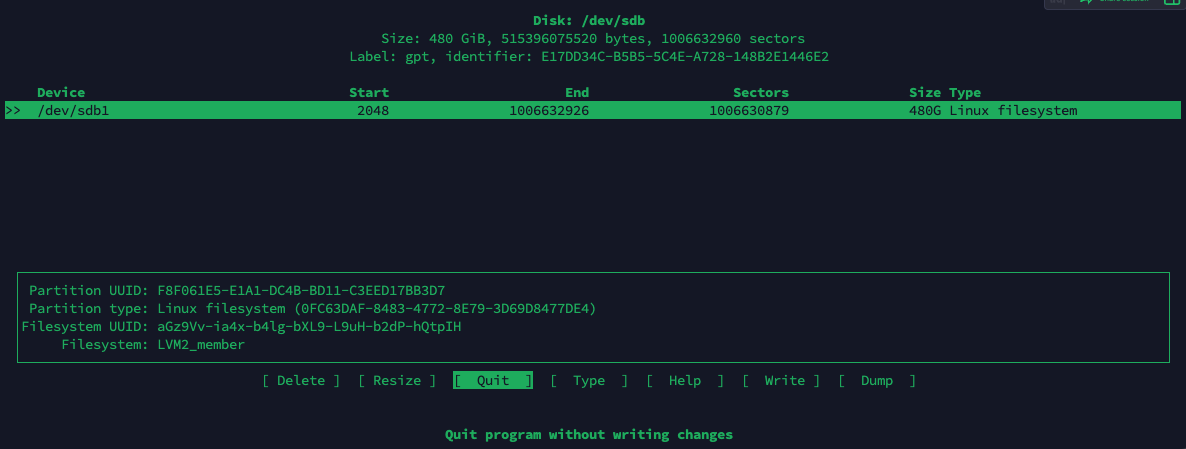
Then choose “Quit” to exit
Check again with the fdisk -l command
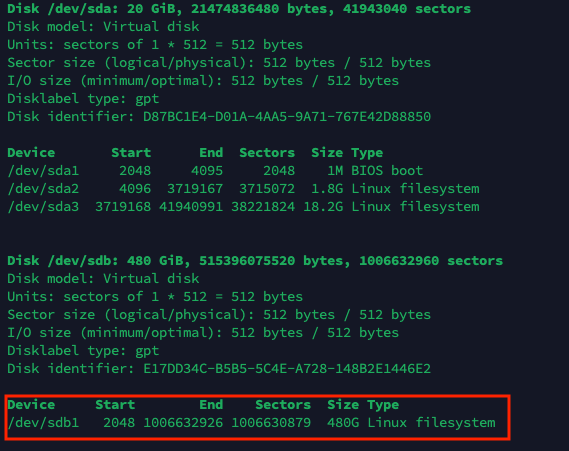
So, I have successfully created a new partition named /dev/sdb1
Step 4: Create a Physical Volume
Use the pvcreate command to create a physical volume
sudo pvcreate /dev/sdb1
Check again with the pvdisplay command
So, I have successfully created a physical volume named /dev/sdb1
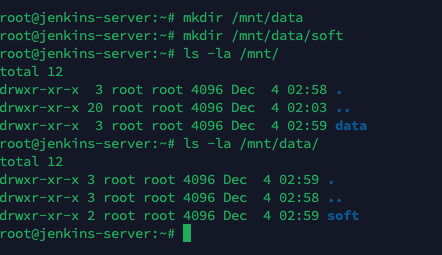
Step 5: Create a mount point
Choose a directory to mount, here I choose /dev/sdb1
mkdir /mnt/data
mkdir /mnt/data/soft
Step 6: Check the Volume Group (VG)
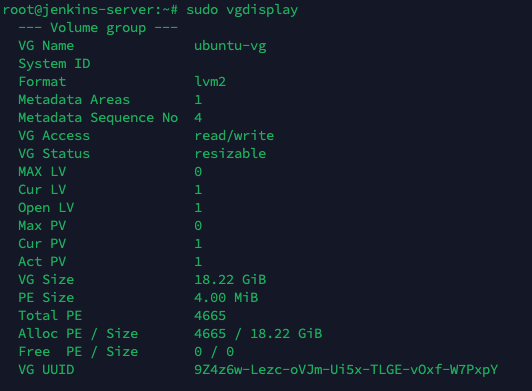
Use the vgdisplay command to check the Volume Group
sudo vgdisplay
Here, I see there is a Volume Group named ubuntu-vg with a size of 20G, and sdb1 has not been mounted yet, I use the vgdisplay /dev/sdb1 command to check
vgdisplay /dev/sdb1

As we can see, /dev/sdb1 has not been mounted to any Volume Group yet, next we will create a new Volume Group
sudo vgcreate soft-vg /dev/sdb1

So, I have successfully created a new Volume Group named soft-vg, use the vgdisplay command to check again
sudo vgdisplay
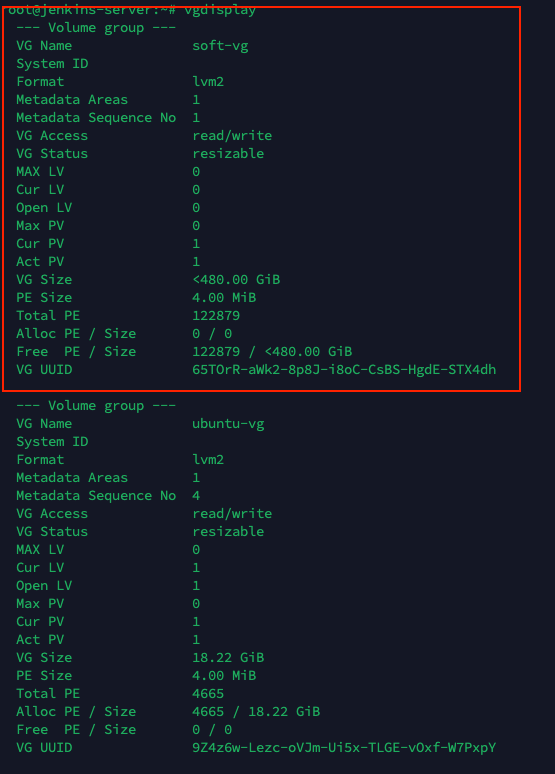
So, I have successfully created a new Volume Group named soft-vg and have mounted it to /dev/sdb1
Step 4: Create a Physical Volume
Use the pvcreate command to create a physical volume
sudo pvcreate /dev/sdb1
Check again with the pvdisplay command
So, I have successfully created a physical volume named /dev/sdb1
Step 5: Create a mount point
Choose a directory to mount, here I choose /dev/sdb1
mkdir /mnt/data
mkdir /mnt/data/soft
Step 6: Check the Volume Group (VG)
Use the vgdisplay command to check the Volume Group
sudo vgdisplay
Here, I see there is a Volume Group named ubuntu-vg with a size of 20G, and sdb1 has not been mounted yet, I use the vgdisplay /dev/sdb1 command to check
vgdisplay /dev/sdb1
As we can see, /dev/sdb1 has not been mounted to any Volume Group yet, next we will create a new Volume Group
sudo vgcreate soft-vg /dev/sdb1
So, I have successfully created a new Volume Group named soft-vg, use the vgdisplay command to check again
sudo vgdisplay
So, I have successfully created a new Volume Group named soft-vg and have mounted it to /dev/sdb1
Step 7: Create a Logical Volume (LV)
Use the lvcreate command to create a Logical Volume
sudo lvcreate -n soft-lv -l 100%FREE soft-vg

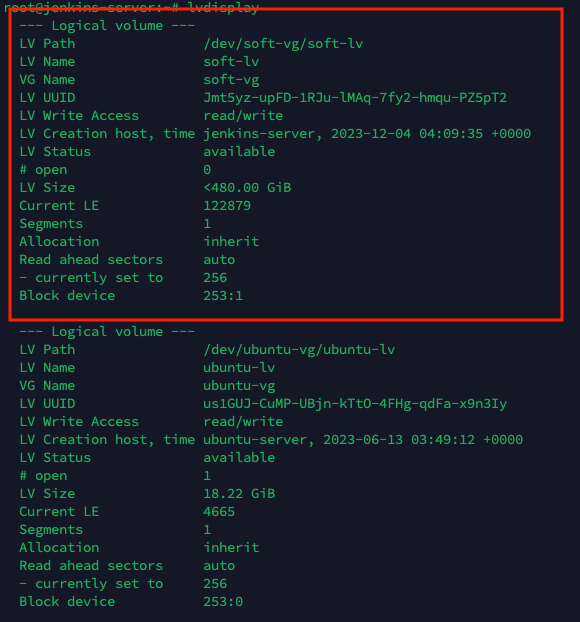
So, I have successfully created a new Logical Volume named soft-lv and have mounted it to the Volume Group soft-vg, check again with the lvdisplay command
sudo lvdisplay
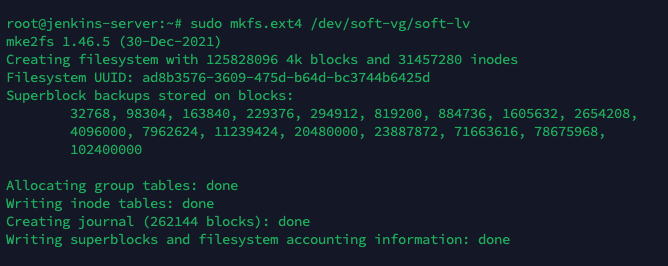
Step 8: Create a File System
Use the mkfs.ext4 command to create a file system
sudo mkfs.ext4 /dev/soft-vg/soft-lv
Step 9: Mount the Logical Volume
Use the mount command to mount the Logical Volume
sudo mount /dev/soft-vg/soft-lv /mnt/data

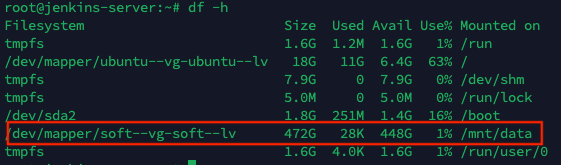
Check again with the df -h command
df -h

So, I have successfully mounted the Logical Volume soft-lv to /mnt/data
Step 10: Automatically mount the Logical Volume when booting
Use the blkid command to get the UUID of the Logical Volume
sudo blkid
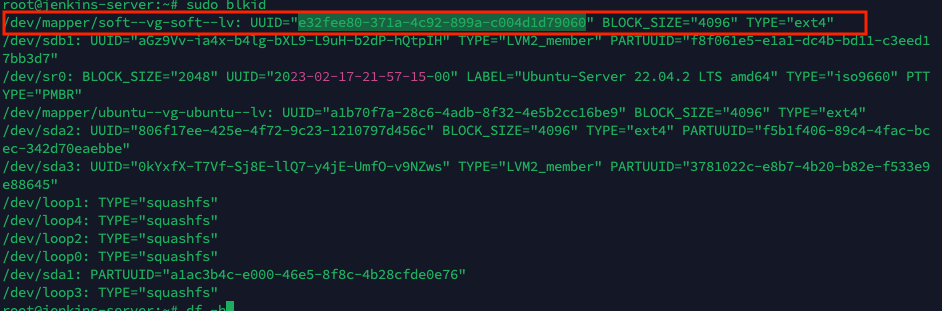
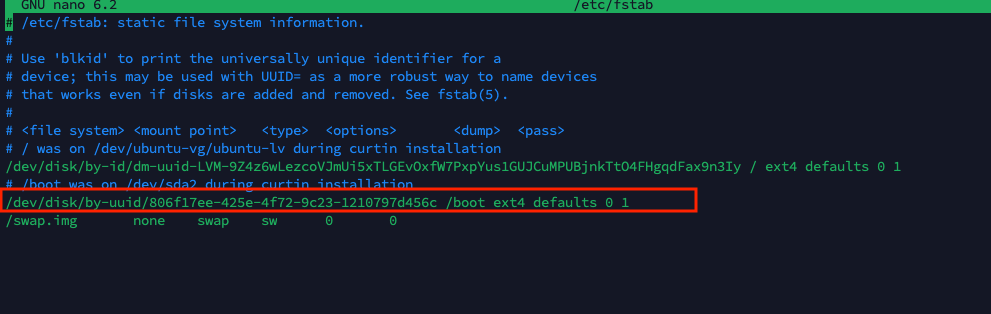
Then add it to the /etc/fstab file
sudo nano /etc/fstab
Add the following line
UUID=e32fee80-371a-4c92-899a-c004d1d79060 /mnt/data ext4 defaults 0 2
So, I have successfully configured it, reboot the machine with the sudo reboot command and check again with the df -h command
df -h